
bxm's IT Story
VPN (DMVPN_Dynamic Multipoint VPN) - 기본, Crypto profile, 이중화 본문
VPN (DMVPN_Dynamic Multipoint VPN) - 기본, Crypto profile, 이중화
bxmsta9ram 2021. 8. 20. 10:41

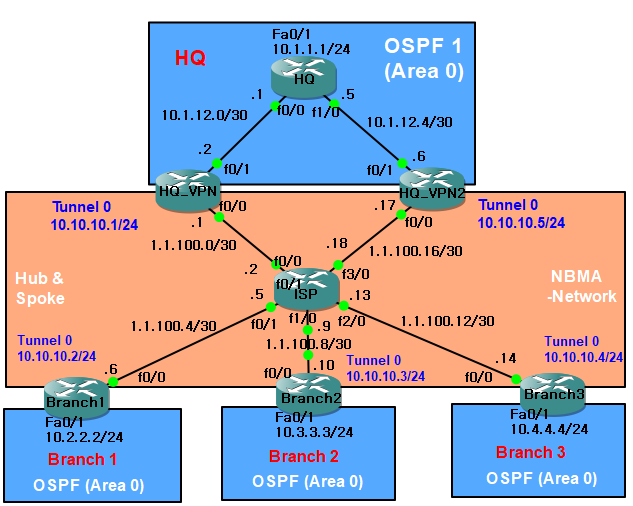
HQ_VPN의 f0/0 단자의 Tunnel이 Point-to-multi로 뚫렸기 때문에 Dynamic Multipoint라고 함.
## GRE_Over_IPSec DMVPN(Dynamic Multipoint VPN) ##
- DPVPN은 본사-지사 사이에 동적으로 확장성 있는 대규모 VPN을 구성하기 적합한 방식이다.
지사가 동적으로 증가하는 경우 매번 본사의 VPN 장비에 새로운 지사에 대한 설정을 추가하는 것은 비효율적이다.
이 경우, DMVPN을 사용하게 되면 본사쪽 장비에 추가 설정 없이 지사 VPN을 추가하는 것이 가능하다.
- 이러한 DMVPN을 구성하기 위해서는 다음과 같은 기술들이 사용되어야 한다.
1) mGRE(multipoint GRE) Tunnel
2) NHRP(Next-Hop Resolution Protocol)
3) IPSec VPN
4) Crypto Profile
- NHRP(Next-Hop Resolution Protocol)
Next Hop Client(NHC)들을 자동으로 Next Hop Server(NHS)에 등록시킨다.
NBMA(Non Broadcast Multi Access) 네트워크는 패킷이 밖으로 빠져나가기 위해 여러개 홉(Hop)을 지나쳐야 한다는
단점이 있다. 그러나, NHRP를 사용하면 이 복잡한 NBMA 네트워크를 단순히 point-to-point 터널의 집합으로 만들어
버릴 수 있다.
본사(NHS:Next Hop Server)는 자기의 Tunnel_IP와 Source(G-IP)를 지사(Branch) 쪽에 등록한다.
NHRP_MAP : 지사와 본사 모두 생성된다.
본사(이하; NHS)장비는 Routing_Table의 Tunnel 목적지 Interface의 실제 IP를 NHRP_MAP에서 조회(매핑)한다.
고로 목적지에 도달성을 갖는다.
- NHRP 설정 순서
1) NHC(Next-hop-client)에 NHS까지의 경로를 설정.
2) NHC가 NHS에 접속하여 NHRP registration을 보낸다.
3) NHS가 NHC들의 매핑(Mapping) 정보를 학습하고, Spoke에 Dynamic NBMA IP 주소를 할당한다.
- NHC(Branch1)이 GRE 터널을 통해서 NHS(HQ_VPN)에게 보내는 'NHRP Request'
| New_IP | ||
| S(Source) : 1.1.100.6 | ||
| D(Destination) : 1.1.100.1 |
## IP 할당 ##
공통]
conf t
no ip domain lookup
line c 0
logg sy
exec-timeout 0
exit
line vty 0 4
pass cisco
end
wr
HQ]
conf t
int f0/1
no shut
ip add 10.1.1.1 255.255.255.0
exit
int f0/0
no shut
ip add 10.1.12.1 255.255.255.252
end
wr
HQ_VPN]
conf t
int f0/1
no shut
ip add 10.1.12.2 255.255.255.252
exit
int f0/0
no shut
ip add 1.1.100.1 255.255.255.252
end
wr
ISP]
conf t
int f0/0
no shut
ip add 1.1.100.2 255.255.255.252
exit
int f0/1
no shut
ip add 1.1.100.5 255.255.255.252
exit
int f1/0
no shut
ip add 1.1.100.9 255.255.255.252
end
wr
Branch1]
conf t
int f0/0
no shut
ip add 1.1.100.6 255.255.255.252
exit
int f0/1
no shut
ip add 10.2.2.2 255.255.255.0
end
wr
Branch2]
conf t
int f0/0
no shut
ip add 1.1.100.10 255.255.255.252
exit
int f0/1
no shut
ip add 10.3.3.3 255.255.255.0
end
wr
## Next-hop Ping ##
HQ]
ping 10.1.12.2

HQ_VPN]
ping 1.1.100.2

ISP]
ping 1.1.100.6
ping 1.1.100.10

## EIGRP ##
HQ]
conf t
router eigrp 1
network 10.1.1.1 0.0.0.0
network 10.1.12.1 0.0.0.0
no auto
end
wr
HQ_VPN]
conf t
router eigrp 1
network 10.1.12.2 0.0.0.0
no auto
exit
ip route 0.0.0.0 0.0.0.0 f0/0 1.1.100.2
end
wr
Branch1]
conf t
router eigrp 1
network 10.2.2.2 0.0.0.0
no auto
end
wr
Branch2]
conf t
router eigrp 1
network 10.3.3.3 0.0.0.0
no auto
end
wr
## Tunnel 개통 및 Tunnel EIGRP에 추가 ##
HQ_VPN]
conf t
ip route 0.0.0.0 0.0.0.0 f0/0 1.1.100.2
## 이전의 Tunnel과는 다르게 Destination이 없음!! 왜냐면 자기 스스로 목적지를 자동으로 정하게 하기 때문임
## 그리고 독특하게 Tunnel key를 넣는다. (무조건 지정을 해줘야 하고, 3개 모두 동일해야함.)
## hold time은 초단위로 지정하고, 기본적으로 600초를 줌. Hello가 없으면 600초 있다가 Neighbor 관계를 끊음.
## nhrp map multicast dynamic -> Mapping 정보를 동적으로 배워라.
int tunnel 0
ip add 10.10.10.1 255.255.255.0
tunnel source f0/0
tunnel mode gre multipoint
tunnel key 1
ip nhrp network-id 1
ip nhrp holdtime 600
ip nhrp map multicast dynamic
exit
router eigrp 1
network 10.10.10.1 0.0.0.0
end
wr
Branch1]
conf t
ip route 0.0.0.0 0.0.0.0 f0/0 1.1.100.5
int tunnel 0
ip add 10.10.10.2 255.255.255.0
tunnel source f0/0
tunnel mode gre multipoint
tunnel key 1
ip nhrp network-id 1
ip nhrp nhs 10.10.10.1 ## Server가 10.10.10.1 이다.
ip nhrp map 10.10.10.1 1.1.100.1 ## 10.10.10.1을 1.1.100.1에 정적으로 매핑시켜라. (D-IP / G-IP)
ip nhrp map multicast 1.1.100.1 ## multicast를 받게 되면, 동적으로 등록한 장비(NHS: D-IP)에게만
자기 정보를 전달해라.
ip nhrp registration timeout 60 ## 반복적으로 60초마다 재등록해라.
exit
router eigrp 1
network 10.10.10.2 0.0.0.0
end
wr
Branch2]
conf t
ip route 0.0.0.0 0.0.0.0 f0/0 1.1.100.9
int tunnel 0
ip add 10.10.10.3 255.255.255.0
tunnel source f0/0
tunnel mode gre multipoint
tunnel key 1
ip nhrp network-id 1
ip nhrp nhs 10.10.10.1
ip nhrp map 10.10.10.1 1.1.100.1
ip nhrp map multicast 1.1.100.1
ip nhrp registration timeout 60
exit
router eigrp 1
network 10.10.10.3 0.0.0.0
end
wr
HQ_VPN]
conf t
router eigrp 1
network 10.10.10.1 0.0.0.0
end
wr
show ip nhrp

clear ip eigrp nei
show ip eigrp nei


Branch1,2]
show ip nhrp


## NHC에서는 Static으로 등록이 되었음을 나타낸다.
Branch1]
show ip route

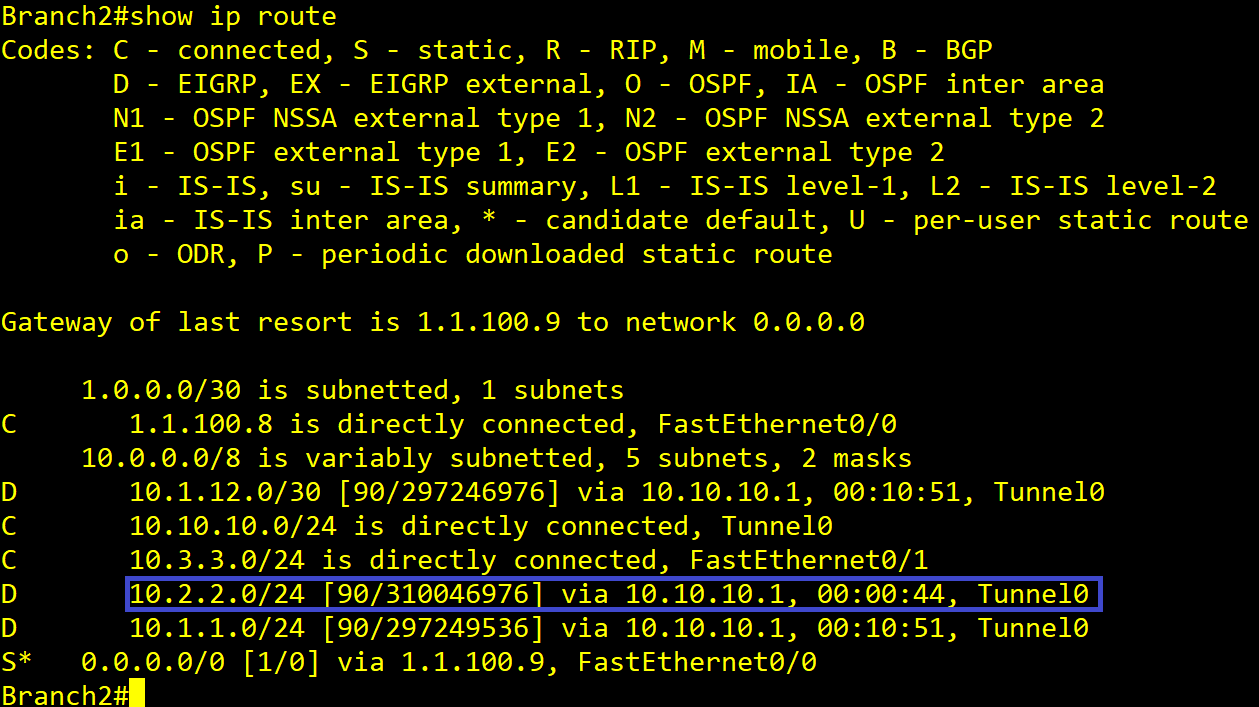
Branch2]
show ip route

HQ_VPN]
show ip int tunnel 0

conf t
int tunnel 0
no ip split-horizon eigrp 1
end
wr
Branch1,2]
show ip route
## 서로 경로가 추가되었다!! 이제 서로 인식하는 것임.

## IPSec VPN Configuration - ISAKMP 만들기 ##
HQ_VPN, Branch1, Branch2]
conf t
crypto isakmp policy 1
authentication pre-share
encryp aes
hash sha
group 2
exit
## NHC가 어떤 IP를 유동적으로 등록할지 모르므로, 아래와 같이 입력한다.
crypto isakmp key cisco123 address 0.0.0.0 0.0.0.0
## 16(Byte? Bit?) 절약 - 어제 했음(Wireshark)
crypto ipsec transform-set IPSEC_SA esp-aes esp-sha-hmac
mode transport
exit
crypto ipsec profile VPN_T
set transform-set IPSEC_SA
exit
## 자동으로 등록하고, 자동으로 Neighbor 관계를 맺기 때문에 Access-list가 들어가지 않았음!!
int tunnel 0
tunnel protection ipsec profile VPN_T
end
wr
HQ]
show ip route

## Crypto map을 안 쓰고, Crypto Profile을 사용한 이유 ##
## Crypto Profile
- Point-to-Point GRE 혹은 Multipoint GRE 터널 인터페이스를 IPSec으로 보호하려는 경우, Crypto map 대신에
Crypto Profile을 사용할 수 있다.
- 위에서 설정한 DMVPN의 경우 Crypto Profile을 사용하게 되면, '보호 대상지정 ACL'과 'Set peer 정보'를 관리자가
설정하지 않아도 자동으로 구하여 Crypto map을 생성하게 된다.
- GRE_Over IPSec도 Crypto Profile을 사용할 수 있다.
## Crypto Profile 설정 순서
1) Point-to-Point GRE 경우, 'tunnel destination'으로 설정한 IP 주소로 ACL과 set peer를 지정한다.
2) mGRE의 경우, 'tunnel destionation' 명령어를 사용할 수 없기 때문에, 'NHRP MAP'에 등록된 상대방 장비의 실제
공인 IP 주소(NBMA 주소)를 사용하여 ACL과 set peer를 지정한다. (지금 하는게 이 것임!!)
- 기본적으로 DMPN의 경우, <X.X.X.X> 정보를 입력할 수 없기 때문에 Crypto map을 설정할 수 없다.
결과적으로 Crypto Profile을 사용해야만 한다!!
## 기존의 것들 저장 후 아래의 새로운 것으로 실습!
## DMVPN GRE Over_IPSec Hub_and_Shake ##


## IP 할당 ##
공통]
conf t
no ip domain lookup
line c 0
logg sy
exec-timeout 0
exit
line vty 0 4
pass cisco
end
wr
HQ]
conf t
int f0/1
no shut
ip add 10.1.1.1 255.255.255.0
exit
int f0/0
no shut
ip add 10.1.12.1 255.255.255.252
end
wr
HQ_VPN]
conf t
int f0/1
no shut
ip add 10.1.12.2 255.255.255.252
exit
int f0/0
no shut
ip add 1.1.100.1 255.255.255.252
exit
ip route 0.0.0.0 0.0.0.0 f0/0 1.1.100.2
int tunnel 0
ip add 10.10.10.1 255.255.255.0
tunnel source f0/0
tunnel mode gre multipoint
tunnel key 1
ip nhrp network-id 1
ip nhrp holdtime 600
ip nhrp map multicast dynamic
end
wr
ISP]
conf t
int f0/0
no shut
ip add 1.1.100.2 255.255.255.252
exit
int f0/1
no shut
ip add 1.1.100.5 255.255.255.252
exit
int f1/0
no shut
ip add 1.1.100.9 255.255.255.252
exit
int f2/0
no shut
ip add 1.1.100.13 255.255.255.252
end
wr
Branch1]
conf t
int f0/0
no shut
ip add 1.1.100.6 255.255.255.252
exit
int f0/1
no shut
ip add 10.2.2.2 255.255.255.0
exit
ip route 0.0.0.0 0.0.0.0 f0/0 1.1.100.5
int tunnel 0
ip add 10.10.10.2 255.255.255.0
tunnel source f0/0
tunnel mode gre multipoint
tunnel key 1
ip nhrp network-id 1
ip nhrp nhs 10.10.10.1
ip nhrp map 10.10.10.1 1.1.100.1
ip nhrp map multicast 1.1.100.1
ip nhrp registration timeout 60
end
wr
Branch2]
conf t
int f0/0
no shut
ip add 1.1.100.10 255.255.255.252
exit
int f0/1
no shut
ip add 10.3.3.3 255.255.255.0
exit
ip route 0.0.0.0 0.0.0.0 f0/0 1.1.100.9
int tunnel 0
ip add 10.10.10.3 255.255.255.0
tunnel source f0/0
tunnel mode gre multipoint
tunnel key 1
ip nhrp network-id 1
ip nhrp nhs 10.10.10.1
ip nhrp map 10.10.10.1 1.1.100.1
ip nhrp map multicast 1.1.100.1
ip nhrp registration timeout 60
end
wr
Branch3]
conf t
int f0/0
no shut
ip add 1.1.100.14 255.255.255.252
exit
int f0/1
no shut
ip add 10.4.4.4 255.255.255.0
exit
ip route 0.0.0.0 0.0.0.0 f0/0 1.1.100.13
int tunnel 0
ip add 10.10.10.4 255.255.255.0
tunnel source f0/0
tunnel mode gre multipoint
tunnel key 1
ip nhrp network-id 1
ip nhrp nhs 10.10.10.1
ip nhrp map 10.10.10.1 1.1.100.1
ip nhrp map multicast 1.1.100.1
ip nhrp registration timeout 60
end
wr
## Next-hop Ping ##
HQ]
ping 10.1.12.2

HQ_VPN]
ping 1.1.100.2

ISP]
ping 1.1.100.6
ping 1.1.100.10
ping 1.1.100.14

## OSPF ##
HQ]
conf t
router ospf 1
router-id 1.1.1.1
network 10.1.1.1 0.0.0.0 area 0
network 10.1.12.1 0.0.0.0 area 0
end
wr
HQ_VPN]
conf t
router ospf 1
router-id 5.5.5.5
network 10.1.12.2 0.0.0.0 area 0
network 10.10.10.1 0.0.0.0 area 0
end
wr
Branch1]
conf t
router ospf 1
router-id 2.2.2.2
network 10.10.10.2 0.0.0.0 area 0
network 10.2.2.2 0.0.0.0 area 0
end
wr
Branch2]
conf t
router ospf 1
router-id 3.3.3.3
network 10.10.10.3 0.0.0.0 area 0
network 10.3.3.3 0.0.0.0 area 0
end
wr
Branch3]
conf t
router ospf 1
router-id 4.4.4.4
network 10.10.10.4 0.0.0.0 area 0
network 10.4.4.4 0.0.0.0 area 0
end
wr
## 이렇게 되면 스포크 현상(자전거 휠의 줄)이 발생함!!
## 이게 당연함!! 왜냐하면 터널 인터페이스는 기본적으로 P-to-P 방식인데, 지금 상황은 P-to-Multi 이니까 OSPF가
오작동을 일으키는 것임.
해결 1) Broadcast로 바꿔주던지..
2) 전부 NBMA로 바꾼 다음에 Neighbor 명령어로 이어주던지...
(Broadcast와 NBMA는 DR을 뽑는다.)
HQ_VPN]
conf t
int tunnel 0
ip os network point-to-multi
ip os hello-interval 10
end
wr
HQ]
show ip ospf nei

show ip route

## IPSec VPN Configuration - ISAKMP 만들기 ##
HQ_VPN, Branch1, Branch2, Branch3] - 이 게시물의 첫번쨰 문제와 똑같음.
conf t
crypto isakmp policy 1
authentication pre-share
encryp aes
hash sha
group 2
exit
crypto isakmp key cisco123 address 0.0.0.0 0.0.0.0
crypto ipsec transform-set IPSEC_SA esp-aes esp-sha-hmac
mode transport
exit
crypto ipsec profile VPN_T
set transform-set IPSEC_SA
exit
int tunnel 0
tunnel protection ipsec profile VPN_T
end
wr
HQ]
show ip route


## DMVPN 이중화 ##
## 방금 전까지 짰던 코드 그대로 놔두고, HQ_VPN2만 건들이면 된다.

HQ]
conf t
int f1/0
no shut
ip add 10.1.12.5 255.255.255.252
exit
router ospf 1
network 10.1.12.5 0.0.0.0 area 0
end
wr
HQ_VPN2]
conf t
int f0/1
no shut
ip add 10.1.12.6 255.255.255.252
exit
int f0/0
no shut
ip add 1.1.100.17 255.255.255.252
exit
ip route 0.0.0.0 0.0.0.0 f0/0 1.1.100.18
## HQ_VPN을 Server로, 나머지는 전부 Client로!
int tunnel 0
ip add 10.10.10.5 255.255.255.0
tunnel source f0/0
tunnel mode gre multipoint
tunnel key 1
ip nhrp network-id 1
ip nhrp nhs 10.10.10.1
ip nhrp map 10.10.10.1 1.1.100.1
ip nhrp map multicast dynamic
ip nhrp holdtime 600
ip ospf network broadcast
exit
router ospf 1
router-id 6.6.6.6
network 10.10.10.5 0.0.0.0 area 0
network 10.1.12.6 0.0.0.0 area 0
exit
## IPSec 맺어주기
crypto isakmp policy 1
authentication pre-share
encryp aes
hash sha
group 2
exit
crypto isakmp key cisco123 address 0.0.0.0 0.0.0.0
crypto ipsec transform-set IPSEC_SA esp-aes esp-sha-hmac
mode transport
exit
crypto ipsec profile VPN_T
set transform-set IPSEC_SA
exit
int tunnel 0
tunnel protection ipsec profile VPN_T
end
wr
ISP]
conf t
int f3/0
no shut
ip add 1.1.100.18 255.255.255.252
end
wr
## HQ_VPN도 약간의 수정을 해주자. 위에서 HQ_VPN만 Server로 놓으려 했는데, 그냥 HQ_VPN2도 Server로!!
HQ_VPN, Branch1, Branch2, Branch3] - 새로 추가된 Server 기입
conf t
int tunnel 0
ip nhrp nhs 10.10.10.5
ip nhrp map 10.10.10.5 1.1.100.17
ip nhrp map multicast 1.1.100.17
ip ospf network broadcast
end
wr
HQ_VPN, HQ_VPN2]
show ip ospf nei


끝 !!

'Network > VPN (KEDU)' 카테고리의 다른 글
| Easy_VPN (Final Version-Split tunnel) (0) | 2021.08.20 |
|---|---|
| VPN (GRE over IPSec) (2) | 2021.08.19 |
| VPN 이중화 (0) | 2021.08.18 |
| VPN (Virtual Private Network, 가상 사설망) - Static VPN, Dynamic VPN (0) | 2021.08.18 |


