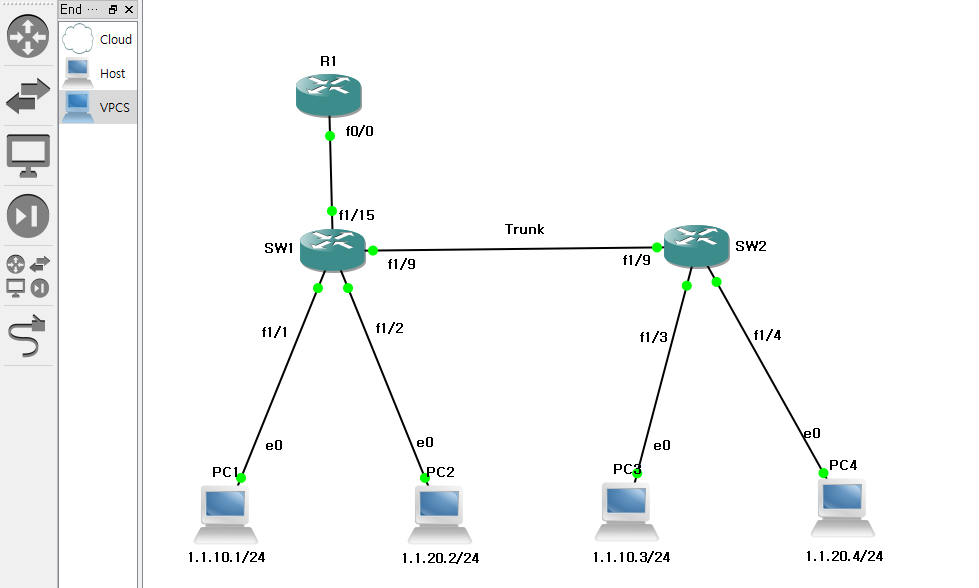
GNS VLAN10, VLAN20 예제 관련하여 Switch와 Router 활용하여 통신망 연결하기.
처음부터 다시 설명해주시는거니까 설명 잘 듣고 캡쳐 순간순간 잘해서 정리하기.
그리고 ios 에서 라우터 동작원리 읽어보기.
기억해야 될 것 딱 3가지.
- 1. VLAN 만들기
- 2. Trunking 연결하기
- 3. IP (Routing) 연결
이 순서만 기억하기.
그리고 추가로.. 아래의 문장들은 복사해놓고 사용하면 유용하니 여기다 적어두겠다.
ena
conf t
no ip domain lookup
line c 0
logg sy
exec-timeout 0
exit
line vty 0 4
pass cisco
exit
hostname
cntl+a+c ==> shitf+insert
① R1 (라우터) - 참고! router는 기본값이 shut down 이기 'no shutdown'을 안해주면 안깨어남.

R1#ena
R1#conf t
Enter configuration commands, one per line. End with CNTL/Z.
R1(config)#no ip domain lookup
R1(config)#line c 0
R1(config-line)#logg sy
R1(config-line)#exec-timeout 0
R1(config-line)#exit
R1(config)#
R1(config)#line vty 0 4
R1(config-line)#pass cisco
R1(config-line)#exit
R1(config)#
R1(config)#hostname R1
R1(config)#
R1(config)#end
R1#
*Mar 1 00:07:47.179: %SYS-5-CONFIG_I: Configured from console by console
R1#wr
Building configuration...
[OK]
R1#
R1#write memory
Building configuration...
[OK]
R1#
② SW1
SW1#
SW1#conf t
Enter configuration commands, one per line. End with CNTL/Z.
SW1(config)#
SW1(config)#no ip routing (라우터의 역할을 할 게 아니므로 꺼준다.)
SW1(config)#
SW1(config)#vlan 10
SW1(config-vlan)#exit
SW1(config)#
SW1(config)#vlan 20
SW1(config-vlan)#exit
SW1(config)#
SW1(config)#int f1/1
SW1(config-if)#switchport mode access
SW1(config-if)#switchport access vlan 10
SW1(config-if)#exit
SW1(config)#
SW1(config)#int f1/2
SW1(config-if)#switchport mode access
SW1(config-if)#switchport access vlan 20
SW1(config-if)#end
SW1#
SW1#
*Mar 1 00:14:37.651: %SYS-5-CONFIG_I: Configured from console by console
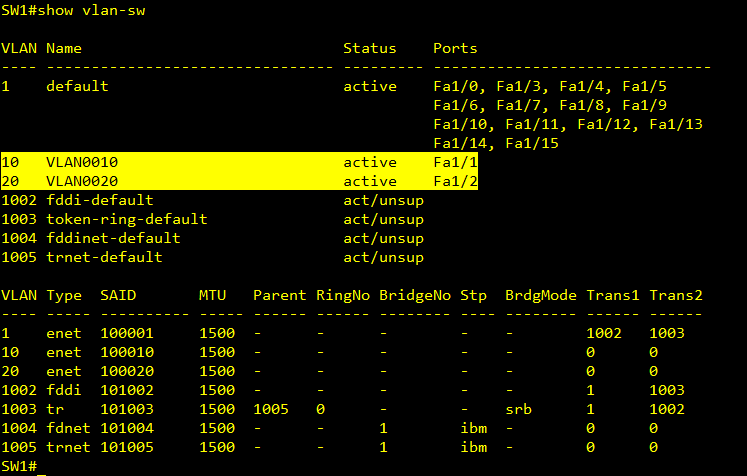
SW1#show vlan-sw (VLAN을 확인하는 명령어!! 3600계열 SHOW VLAN-SW // 3700계열 SHOW VLAN BRIEF)
VLAN Name Status Ports
---- -------------------------------- --------- -------------------------------
1 default active Fa1/0, Fa1/3, Fa1/4, Fa1/5
Fa1/6, Fa1/7, Fa1/8, Fa1/9
Fa1/10, Fa1/11, Fa1/12, Fa1/13
Fa1/14, Fa1/15
10 VLAN0010 active Fa1/1
20 VLAN0020 active Fa1/2
1002 fddi-default act/unsup
1003 token-ring-default act/unsup
1004 fddinet-default act/unsup
1005 trnet-default act/unsup
VLAN Type SAID MTU Parent RingNo BridgeNo Stp BrdgMode Trans1 Trans2
---- ----- ---------- ----- ------ ------ -------- ---- -------- ------ ------
1 enet 100001 1500 - - - - - 1002 1003
10 enet 100010 1500 - - - - - 0 0
20 enet 100020 1500 - - - - - 0 0
1002 fddi 101002 1500 - - - - - 1 1003
1003 tr 101003 1500 1005 0 - - srb 1 1002
1004 fdnet 101004 1500 - - 1 ibm - 0 0
1005 trnet 101005 1500 - - 1 ibm - 0 0
SW1#
③ SW2
SW2#
SW2#conf t
Enter configuration commands, one per line. End with CNTL/Z.
SW2(config)#
SW2(config)#no ip routing (SW1과 마찬가지로 라우터의 역할을 할 게 아니므로 꺼준다.)
SW2(config)#
SW2(config)#vlan 10
SW2(config-vlan)#exit
SW2(config)#
SW2(config)#vlan 20
SW2(config-vlan)#exit
SW2(config)#
SW2(config)#int f1/3
SW2(config-if)#switchport mode access
SW2(config-if)#switchport access vlan 10
SW2(config-if)#exit
SW2(config)#
SW2(config)#int f1/4
SW2(config-if)#switchport mode access
SW2(config-if)#switchport access vlan 20
SW2(config-if)#exit
SW2(config)#
SW2(config)#
④ SW1
SW1#show cdp
Global CDP information:
Sending CDP
⑤ R1

⑥ SW1

show cdp nei : 현재 SW1에서 SW2와 R1 이 2개와 연결되어 있다고 나옴.
그리고 R1은 R(라우터) S(스위치) 다 된다는 뜻.

show interface trunk : trunk를 확인해보니 제대로 trunk가 되어있다.
⑦ SW2

⑧ R1 (이제 IP 넣을 차례, 아래 PC1~PC4의 Gateway 주소가 된다.)

⑨ PC1

⑩ PC2

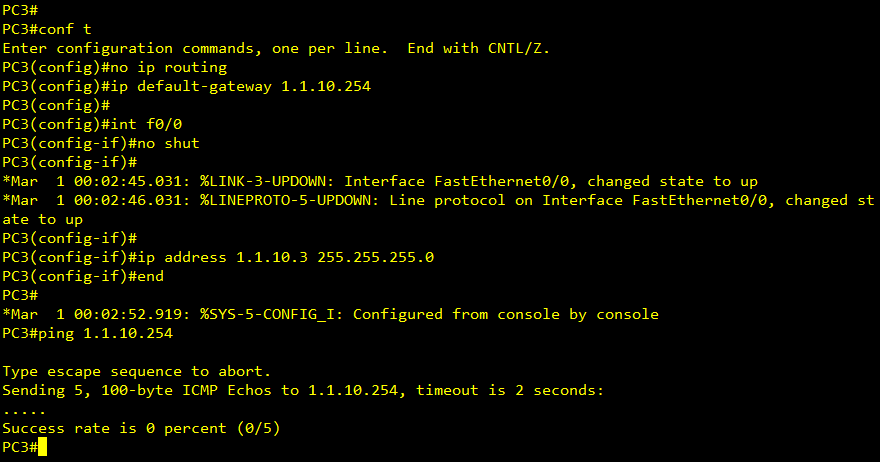
⑪ PC3
⑫ PC4
